Acoustical Duct Silencers & Lagging
Acoustical Duct Silencers and Duct Lagging help to control airflow generated noise typically from a fan at the origin of the duct.
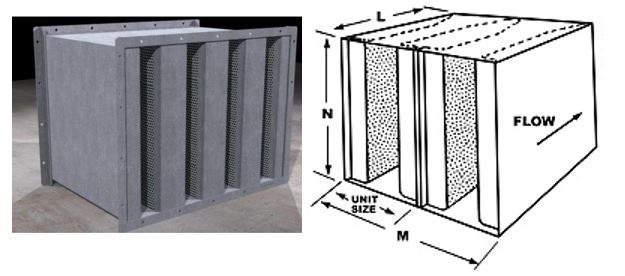
Duct silencers are a solution for lowering airflow noise from traveling through the duct. These sound attenuators are the same dimensions of the ductwork on the interior with an enlarged exterior skin that is backed with sound absorbing media. As the air goes through the acoustical silencer, the sound is reduced. Silencers and the sound absorbing insulation are sized to handle the airflow CFM and available pressure loss in the system to provide the highest sound attenuation.
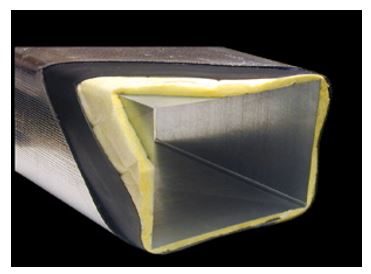
Duct lagging is a product used to reduce breakout noise in a duct system. Acoustical lagging is essentially adding mass or weight to the outside of the ductwork with an added airspace provided by the fiberglass decoupling layer. The mass and the airspace together provide a high level of noise reduction.
Duct Silencer Construction
Duct silencers are constructed of a solid steel outer skin, typically 16 or 18 gauge and a perforated inner skin and the void is filled with acoustical absorbing materials. The air silencers can be made rectangular or circular and typically 36” long at a minimum.
The performance of a silencer is measured in insertion loss expressed in dB. The true attenuation or noise reduction of a silencer. Insertion loss can be directly subtracted from the noise levels of a fan or other noise maker that the silencer is attached to achieve the resultant, quieted noise levels.
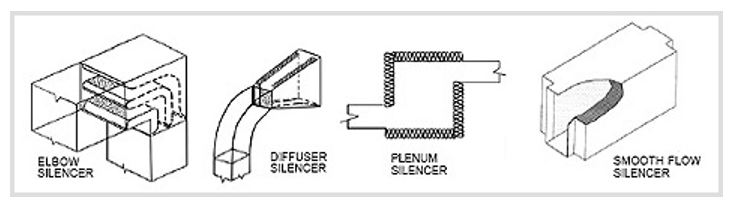
How Air Noise is Generated
Generated noise is what happens due to air flowing through the silencer and is of concern in the
supply air mode only. That is, supply air enters the silencers at one face velocity (fpm) and then
speeds up as it moves past or between the silencer baffles or silencing bullet.
Downstream (exit)of the silencer, the air expands to fill the space. The space can be the inside of ductwork, a stack
or worst case the atmosphere (termed an abrupt expansion). This expansion causes silencer
generated noise. It is like blowing through a whistle or straw. The air speeds up then expands.
This expansion causes sound (generated noise). Therefore, you “don’t get something for
nothing”. With a silencer under positive/forward/supply airflow you get attenuation (insertion loss)
and generated noise.
One final issue, generated noise and insertion loss are both a function of pressure drop. The
higher the silencer pressure drop, the greater the generated noise levels and insertion loss
values. As long as you have a pressure loss equal to or less than 0.35 inch WG, generated noise
is not a problem.
Duct Silencer Insulation
Duct Silencers are most commonly used Centrifugal or Axial Fan intake and discharge, Air Handling Units (AHU), Radiator Fan Cooled Gensets and Equipment Enclosures.
Duct lagging is a 1 or 2 pound per square foot mass loaded vinyl sound barrier with a reinforced aluminized facing. Typically 1” or 2’ of fiberglass batt are wrapped around the duct and the acoustical lagging is wrapped around the fiberglass creating a fire rated assembly.
Duct Lagging Installation
Duct lagging is a simple installation.
- First, determine the circumference of the duct or pipe to be wrapped. Note additional length required
to accommodate thickness of material. Add 2–4 inches overlap of product onto itself. (Note: Quilted Fiberglass side goes up against the Duct or Pipe) - Utilizing standard 54” wide rolls, cut length as determined above. After cutting piece from roll install first section on the duct or pipe. Drape the cut piece over the pipe or duct with equal parts of the product hanging over each side. One side is then brought up and adhered to the pipe or duct with a foil lag tape.
- The other side is then brought up, making sure to overlap the first side, and secured with tape. This method allows for circumferential seams approximately every 50” to 52”, and a single seam running along the bottom of the pipe or duct.
- Add additional wraps of tape around circumference as required to snug lagging to pipe or duct. Where specified or as required banding should be installed in addition to tape to secure lag to pipe or duct.
- On large rectangular ductwork, a mechanical fastener such as stick pins or weld pins should also be utilized, with additional emphasis on supporting product across the bottom to prevent sagging. Cut and install the next section in the same fashion.
- Each progressive section should overlap the previous section by 2 inches (+/-). Tape this seam with a 4” wide foil lag tape. When covering an elbow, the usual method is to “gore” the product (as typical in sheet metal construction). In all cases the important element is to assure there are no gaps or leaks whatsoever.
Duct lagging is typically used in applications and building where there are areas where people will be sensitive to noise such as conference rooms, ducts above offices and acoustical drop ceilings, performance spaces, churches, and schools.